I still haven't managed but put ink to card yet - the holidays seem to pass in a blur of seeing goods friends and catching up! So I thought I would share with you the beautiful gift and card that I received from my secret santa from ILWS...
We had to put up a wish list of things that we would like to receive and these pictures show what Sue has sent for me. I listed the distress kit as one of my signatures to the cards that I make is inking every layer that I add to the card - and I had not yet purchased this for myself but was dying to have a go. I was also sent a lovely button bracelet, some scrap book tags and then there were some charms as well. I was so pleased everything was beautifully packaged and hand stamped.
I even saved the gift for Christmas morning and put it in my stocking under the tree! I was very impressed with myself. I will definately have to take the time to have a play in the next few days, before I forget how to craft altogether! (I wonder if that is possible!)
So I hope you all have a wonderful new year - what ever you chose to do and I will see you next year - and I promise there will be a card that I have made!
Thank you for all your lovely comments this year and for continuing to visit my little old blog! Your support is very much appreciated - Debbi x x x
INSPIRE... CREATE...SHARE... I love papercraft and love to share the work I have created... I will try and be better at this! x
Friday, 31 December 2010
Thursday, 30 December 2010
Hello...
Today is the first day of the most exciting Stampin' Up! promotion of their calender HOORAH! I hear you all shout! It is Sale-a-Bration. There are some great stampsets that are available and they are so versatile...
Here is the leaflet with further details on for you...
I will be back later with some samples for you! Normal service should now be resumed! I have missed my crafting but with the boys as they were I have little more than wipe noses, hand out medicine and watch televison!
I hope you have all had a lovely Christmas and that you have had lots of fun and managed to do some crafting as well...
Wednesday, 1 December 2010
Another Forever Friends...
This card is a card that I have created for one of the candle orders that I have have completed - Very simple and in traditional colours using Stamping Up! DSP and a Forever Friends image that is coloured with SU colours, I have kept the colours simple and I have added depth to the colour. I have done this by adding a layer of colour letting the image dry and the adding another layer of colour. I have inked the edges of the panel and then mounted this on cherry cobbler and garden green card - inking the edges of each layer.
I have then added the sentiment to the bottom left of the card and stamped this in cherry cobbler on a white card blank, where the edges are inked (surprise surprise!)
The DSP is a couple inch panel that is added to the top of the card and there is a small gap to the top.
I hope you like the card and thanks for looking - Debbi
The snow is still falling so probably not much crafting tomorrow as my boys are at home with me! x
Tuesday, 30 November 2010
Welcome Christmas...
Here is a card that I created using this beautiful set Helen came to play a few days ago and this is one of the images that I stamped whilst she was here. I decided to do the card monochromatic as the shadow image lends itself to this really well and I love this scene. To me this is what Christmas is all about.
I inked the edges of the image and then mounted this on black and then white. Putting the layers on to a black card blank. The sentiment is from old fashioned Christmas and is stamped to the top of the image panel, even though the top of the sentiment is missing I don't think that this takes away from the overall effect.
I hope you like this simple card and thanks for looking - Debbi x x x
Monday, 29 November 2010
A navity...
The card that I posted yesterday was one created using a penny black nativity image and I thought that this would create the most lovely candle! For the next Christmas fair that I think that they will make a great set... I have stamped the image on tissue paper and coloured in chocolate chip and some blue and then sealed this onto the candle using my heat gun. Each time I do this technique I am surprised how easy it is to get perfect results. Over this week I will be showing some of the other cards and gifts I have created for the fair!
Many people have asked about this technique and all I use is cheap tissue paper and very cheap greaseproof paper! When packaged up they look great and these have been the most popular of the orders that I have taken.
I love the effect... I hope you like the candle and thanks for looking - Debbi x x x
Sunday, 28 November 2010
penny black challenge...
Morning! Today's card was inspired by the challenge that is on the Penny Black Challenge Blog this week the theme was to make your card monochromatic - I love this idea for creating a card it is so simple and makes your stamped images stand out so effectively. The stamp that I have used is the nativity scene and I have yet to make a card using this stamp - each of the images that I have coloured I haven't been happy with, they didn't seem to look good in many different colours and then I found this challenge. I have coloured the image using only my chocolate chip ink pad and an aqua marker. I love the depth of colour that you can create using this method and the may different shades that can also be made just by adding a little water.
I have then inked the edges of the very vanilla panel. I have used a plain white card and inked the edges in chocolate chip and added a piece of chocolate chip Christmas DSP to this with ribbon detail above this with a bow tied to the right hand side.
I have added no sentiment to the front of the card but stamped Christmas Wishes on the inside in the middle, and inked the edges to this also.
I hope you like the card and thanks for looking - Debbi x x x
Saturday, 27 November 2010
CHRISTMAS IS COMING...
Well it seems to be coming very very fast this year - but is this because Joshua is very excited and for the first time in years we are very much on the last minute! So I am making lots and lots of candles at the moment and am loving doing them - they are so quick to do once you get used to the technique you can create perfect results that will last for years (as long as you don't light the candle!)
Here are some pictures for you!
I love how the effect can be altered by how you colour the image and each time I complete a candle am amazed by how good the results look!
I hope you like them and thanks for looking! Debbi x x x
Sunday, 21 November 2010
our support for SU??
One of the other swaps that I did manage to complete - very late I might add at the recent convention was a 6x6 scrapbook page for demo support. Chris and Eileen are the lovely people that we get to phone when we need advice or to speak to them with an order. They are always there when we need them and always take the time to speak to us about the everyday things going on with our lives! So one of the lovely ladies on ILWS organised to make them a scrapbook with pages from all the demos that wanted to contribute. I didn't originally sign up for this but contacted Helen to say that I had enough time to give her a page... This is what I created using a black mat with tempting turquoise and the stamp set vintage vogue. I have used a whisper white panel and written a message to Chris and Eileen thanking them for all they do for me and how much the work that they do means! I have stamped the vine from the set on the right hand side and have added flowers to this making them 3D with dimensionals. I have stamped one of the sentiments from the set in the top right hand corner of the page and love the bright colours!
I hope you like the page I made and thanks for looking! Debbi x x x
Thursday, 18 November 2010
recent workshop...
Sorry been absent for a few days - where does the time go??
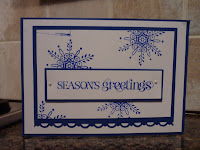
So at a recent workshop I was asked to do Christmas cards which I love doing any time of the year and also for me to demo embossing... For the card I decided that I would use serene snowflakes which is a set that I have had for ages and rarely used - but it is one of those that you come too and once you begin your project the ideas keep on coming.
The colour combination I used for the card was night of navy and soft suede colours that I have not used together before but when looking at colours I think they go really well together. I love the depth of the blue and the shade of brown is not as deep as chocolate chip and lends itself really well as a contrast to the depth of the blue.
I layered a blue card blank with suede and then very vanilla inking the edges of each layer and random stamped the snowflakes over each layer, adding a ribbon to the top of the card and stamping the sentiment from heard from the heart.
The panel that I demoed embossing on used the shimmer paint and also lovely as a tree again on night of navy card stock. I used a dauber and the shimmer paint to colour the stamp and then add this to the card panel I then added clear embossing powder to the top of this and sealed it with a heat gun. To finish the panel off I inked the edges of the night of navy panel.
The gift that I made for my lovely hostess Bev was a stamped photo frame using the stamp set we used for the make and take and what I had demoed. I have just randomly stamped the frame and stamped some of the images off and I added the beautiful twinkly rhinestones - that I love...
I hope you like the card, demo and frame from the workshop I am sure that Bev and ours friends enjoyed themselves on the night! Want to book your own party?? email me for dertails!
Thanks for looking - Debbi x x x
Saturday, 13 November 2010
more pictures...
One of the greatest things that we get to see at Convention is all the card samples that the European demos hand in for the display boards, there are so many talented people that are demos and it is great to see the different tke that they have on a stamp set and the different colours that are available. So much inspiration on these boards they are great to examine!
The display boards were positioned in one of the main halls set to the side so that we had lots of space in between to roomily continue with our swapping whenever we had a break, I will post pictures of the rest of my swaps over the weekend and some of the great swaps that I received in return, some are truly beautiful and have a lot of work in them!
This picture I am sharing of Shelli and I is of her giving me a cuddle after she heard me talk (with the very husky voice that is still not doing so well!) and hearing that I had missed the gala awards dinner due to being unwell and spending the evening in my hotel room instead of at the party! Bekka very kindly just snapped a couple of pictures as we were talking and I love this shot! (thanks)
Thanks for looking and I hope you are enjoying sharing some of my pictures! Even though I was poorly it was a great time and I cannot wait for next year - Debbi x x x
Friday, 12 November 2010
Some Convention Pictures...
Well the Convention last weekend was brilliant! I was ill which was not but it was great to spend some time with some lovely and talented people... I have taken loads of pictures some of which I will share with you over the next few days, it was really inspirational and has given me loads of ideas of what to do in relation to crafting in my local area in the coming months! Watch this space...
This series of marquees was where the main classes were held for the British demos as there were so many of us! They were really spacious and surprisingly warm.
Unfortunately I do not have any pictures of the gala dinner as that was the day that I was ill - I spent that evening in my bed... Wasted was my new dress and shoes - gutted. So here is a picture of where I was when the other lovely dressed up ladies were eating beautiful food.
Here is a picture of all the Convention bags before we had picked them up, I love it and will be using it regularly from now on I love the patent material and all the bright colours - the bag tag that I made to hang from the bag is a perfect match, if you would like to join me next year for crafting fun and classes - email me for further details of how you can x
Here is Shelli on the first day of our get together... I have said this before the greatest thing for me about our Convention is getting to chat to Shelli and the rest of the staff that makes Stampin' Up! the great company it is... There were several occasions that we could sit down and chat with Shelli and the rest of the staff and posing for pictures come second nature to Shelli! Always smiling and looking great - my excuse is the germs that I was carrying around with me!
Here is a picture of us all with Shelli!
More pictures tomorrow!
Thanks for looking Debbi x x x
Wednesday, 10 November 2010
roomie gift...
So what I am showing you today is the gift that I made for the lovely Sarah who I had the pleasure of sharing a room with. As well as the candle and the card I also made her a bag tag to match the convention bag - which was the same as the ones that I made for my SU sisters and mummy!
The candle I have decorated using the traditional method of tissue paper and a heat gun. As the candle was a coloured one I chose darker colours to stamp in and was more careful when trimming the image before sealing to the candle. I have used the stamp set vintage vogue and stamped the vine in old olive and then the flowers in basic black. I have also added a gem to the centre of the flower for some extra bling! I have made the card to match and have used the colours pumpkin pie, basic black and whisper white. I have stamped the vine in old olive also. The flowers that I have added to the panel are in both pumpkin and black and i have decoupaged these using a dimensional, again I have added a jewel to the centre. This was onto whisper white and then I have inked the edges and this is then mounted onto pumpkin pie and then onto a basic black card blank. On the right hand side of the white panel I have added a tab of basic black ribbon. I put the candle into a clear bag and added some linen thread to tie the top.
I hope you like the card and candle and thanks for looking - Debbi x x x
Monday, 8 November 2010
3D swap...
For this swap I decided that I would make a Christmas organiser with a twist... I used a Christmas stamp set however the colours that I chose to stamp the set in were not that traditional - some of them were but not all I used the brights collection from the new catalogue a must buy for its fantastic value... The set that I used was Sparkly and Bright.
This swap I pinched the idea from a new crafting friend Anne who made the organiser for me on a recent crafting afternoon - I had to alter the size slightly as Anne had used a folder for the base and I used a 12x12 for mine. I used a shopper jotter pad for one side and the print outs are from a website where there are loads of useful ones available for crafting projects.
So the card I used was craft and whisper white for the base textured for the base, and I stamped on whisper white and mounted the panels on card stock that matched the bright i was using at the time! I have stamped the images in the same colour and have inked the edges of each panel. on the front I stamped the sentiment from occasional greetings 'for you'
I loved doing this swap and making them really tested me when under pressure for a project and having to have them completed in time! phew I managed it! and the swaps that I received in return were some of the best that I have ever received - I will post photos of these tomorrow!
I hope you like my project and thanks for looking - I will start to post the pictures of the Convention in the next couple of days - it was great!
Thanks for looking - Debbi x x x
Convention Projects...
So the first project that I completed was the card candy and I cannot tell you how long I agonised over this for... I knew the stamp set that I was using - artistic etchings and I had decided that the colours I was going to use were cherry cobbler, black and confetti white.
I made three of the pieces very quickly but the three larger pieces I really struggles with - this is the first time that I had done the card candy and I wanted to make sure that I did all the other talented demos justice. I think that I managed this and was very pleased with the results. I love the colour combination that I have chosen.
I have not used a sentiment in the examples other than the armour that come with the stamp set. I didn't think that it was needed. I have layered up every piece and I think that gives them more depth and the embellishments that I have added reflect the bling needed to add a little sparkle to the pieces and I love the effect of the ribbon - such a simple idea to fold a piece in half and staple it to the project...
I hope you like the examples my group got and thanks for looking
If you would like to purchase this stamp set - please email me for further details! Debbi x
Thursday, 4 November 2010
off to convention...
Morning blogland for today's post I thought I would show you something that I have made for some of the ladies I will be meeting up with later today... One of the swaps that I joined was a business ideas swap - this is to showcase various ideas that will help us show the stampin' up! products to their best! I decided to make the ladies in my group a cardstock sampler. This having a sample of every colour of cardstock from the catalogue in each of the the colour families.
It means that when we are at a workshop we can have them to hand highlighting how the card co-ordinates and the quality. The one thing that I have been using mine for though is to see if various colour work together - it is really handy and I have attached mine to my tote.
The packing is done and the swaps are all prepared - this has been a very stressful week trying to organise various crafty items, cards and gifts as well as clean a house and get the boys and pooch ready for me leaving. On top of all this we have all been poorly and hubby has now started with a cold and Aidan is still teething! Be back with many photos on Sunday and some of the crafty swaps I have been involved with - To all my SU buddies - see you later!
Thanks for looking and have a great week - London Baby!
Debbi x
Wednesday, 3 November 2010
scraps...
Todays post is one that both myself and my friend Steph loved doing at the end of a card class last week we were left with a card blank each and some scraps so we decided to each make a gate fold card. We had a little competition to see who could make the best of the contempo christmas set - still using the same colours as were used in the class and best use of the punch too. I was trying to explain to Steph how I wanted my card to look but this was not coming across - hence the examples of the cards we produced
We used the colours cherry cobbler and night of navy and whisper white.
Step has added two baubles one top and one bottom and stamped the sentiment beside each one of these and a panel of card stock to creaate a mat.
I have stamped and punched 3 baubles and they are added in a diagonal line across the card and added a panel of card stock to each side of the card blank. On the inside of the card I have stamped the sentiment and the bauble from the set.
I hope you like our cards and thanks for looking - I am away now at Convention and if I have time this evening will try and schedule some posts for the end of the week - however previous attempts on this have failed for me!
have a great week - Debbi x x x
not sure why the top pic is the wrong way around sorry!
Monday, 1 November 2010
Here is this month's offer to get you in the mood for making all your Christmas cards and finishing them with something special! If you have any questions please email me... Your qualifying order will have to placed by the 29th November! For the month of November I will be offering free postage and packaging on all orders!
At the end of November I will be doing a stamper stack Christmas class using Contempo Christmas and the co-ordinating punch, this will include 10 cards and co-ordinating gift tags for £12.00 - email me for further details!
Have a good week x
Choose from these bundles:
*Bundles and ribbons available while supplies last
Choose from these ribbons:
Description | Wood-Mount Item | Wood-Mount Price | Clear-Mount Item | Clear-Mount Price |
Gifted Bundle Gifted Set and Jolly Holiday Designer Series Paper | 124051 | £35.70 | 124052 | £30.70 |
Welcome Christmas Bundle Welcome Christmas Set and Christmas Cocoa Specialty Designer Series Paper | 124063 | £36.90 | 124064 | £31.90 |
Season of Joy Bundle Season of Joy Set and So Swirly Stampin’ Around Wheel | 124055 | £36.45 | --- | --- |
Delightful Decorations Bundle Delightful Decorations Set and Ornament Punch | 124058 | £37.45 | --- | --- |
Choose from these ribbons:
Description | Item | Retail Value |
Mistletoe Ribbon Originals | 116792 | £11.50 |
Sleigh Bells Ribbon | 116795 | £8.50 |
Riding Hood Red 1-1/4” Striped Grosgrain Ribbon | 113099 | £10.25 |
Real Red 3/4” Polka-Dot Grosgrain Ribbon | 115608 | £10.25 |
thanks for looking - Debbi x x x
Friday, 29 October 2010
Contempo Christmas...
Well this week saw my latest class and here are the cards that we made - I have chosen to use cherry cobbler, night of navy and whisper white for a traditional Christmas theme I loved preparing this class and I think that these cards are just the right thing to get you into the Christmas mood... After the European Stampin' Up! Convention that is next week I will be making many a Christmas card and gift for the orders that I am taking and also a craft fair or two!
So for these cards I have created three different designs the first very simple but I think very effective, I have used a night of navy blank and inked the edges, matting this with whisper white and then again with cherry cobbler. In the centre of this I then added a piece of whisper white where I have inked the edges in night of navy. I have stamped the sentiment from the Contempo Christmas set in night of navy to the centre of this panel and added a bauble on dimensionals to the centre also. To finish off the bauble I have added night of navy ribbon as the string.
The second card I used a rich cobbler blank and inked the edges and to this I have added a night of navy panel and inked the edges and then a piece of whisper white. I have stamped three baubles two night of navy and one rich cobbler, the middle one popped up on dimensionals. I have stamped the sentiment from the stamp set in night of navy to the bottom centre of the card.
The final card in the set is using the technique that we were shown at the recent regional training I attended where we had to stamp three of the baubles and fold them in half sticking them together to make a 3D bauble on the card. For this card I have used again a night of navy again with a cherry cobbler mat with a whisper white on top of this one. I have added the 3D bauble to the centre of the card and added gold elastic thread to the top of the bauble for the string. The sentiment added to the bottom centre of the card to complete it.
I hope you like these cards and if you would like to purchase this stamp set please get in touch. Thanks for looking and your comments are appreciated - Debbi x x x
I will try and schedule some posts for next week of the swaps that I have been completing but don't want to share too much too soon - until I know many people will be free of blogland! x
So for these cards I have created three different designs the first very simple but I think very effective, I have used a night of navy blank and inked the edges, matting this with whisper white and then again with cherry cobbler. In the centre of this I then added a piece of whisper white where I have inked the edges in night of navy. I have stamped the sentiment from the Contempo Christmas set in night of navy to the centre of this panel and added a bauble on dimensionals to the centre also. To finish off the bauble I have added night of navy ribbon as the string.
The second card I used a rich cobbler blank and inked the edges and to this I have added a night of navy panel and inked the edges and then a piece of whisper white. I have stamped three baubles two night of navy and one rich cobbler, the middle one popped up on dimensionals. I have stamped the sentiment from the stamp set in night of navy to the bottom centre of the card.
The final card in the set is using the technique that we were shown at the recent regional training I attended where we had to stamp three of the baubles and fold them in half sticking them together to make a 3D bauble on the card. For this card I have used again a night of navy again with a cherry cobbler mat with a whisper white on top of this one. I have added the 3D bauble to the centre of the card and added gold elastic thread to the top of the bauble for the string. The sentiment added to the bottom centre of the card to complete it.
I hope you like these cards and if you would like to purchase this stamp set please get in touch. Thanks for looking and your comments are appreciated - Debbi x x x
I will try and schedule some posts for next week of the swaps that I have been completing but don't want to share too much too soon - until I know many people will be free of blogland! x
Tuesday, 26 October 2010
Mad Cat...
This is one of my favourite penny black images and I love the expression on the cat's face. As a crafter it doesn't how long you have had your stamps - you just keep adding to them! buying more and more... but ssshhhh don't tell anyone!
I have coloured the image using my SU! colours and an aqua painter and am pleased with the results I have used my inkpads rather than pens, water colours pastels or the pencils (all of which I have!) I have used the black watered down to be more subtle and I have used pixie pink for the ears of the cat, again watered down for the subtle colour. I have then inked the edges of the image in black and double mounted it on basic black and pixie pink. The sentiment is stamped in black and mounted on black then pink.
I have added three card candy to the top right of the card in black and pink and I think that they match really well. I have used a white card blank and have inked the edges in both the pink and the black colours rthat I have used. I then added a black panel to the middle of the card and have added the image to the top left and the sentiment to the bottom right.
I hope you like the card and thanks for looking - Debbi x x x
Monday, 25 October 2010
WINNERS...
LAUNCH RAFFLE....
This is for all people that placed an order this month with my workshops and openhouse... The prize DASHER, NIGHT OF NAVY, CHOCOLATE CHIP and CHOCOLATE CHIP RIBBON -
1) Joan
2) Sam
3) Sue
4) Tracey
5) Nicola
6) Anne
7) Bev
8) Steph
I have used random number generator for the winner which was...
This is for all people that placed an order this month with my workshops and openhouse... The prize DASHER, NIGHT OF NAVY, CHOCOLATE CHIP and CHOCOLATE CHIP RIBBON -
1) Joan
2) Sam
3) Sue
4) Tracey
5) Nicola
6) Anne
7) Bev
8) Steph
I have used random number generator for the winner which was...
So Tracey has won the raffle prize well done - when you pick up your order you can pick up your goodies too! and thank you everyone for attending my launch, workshops and placing an order...
So now to the Blog Candy I have had some lovely comments and thank you to the new followers - I hope you like my blog and find some inspiration from what I share with you! The back is on the mend but I am still getting twinges and after most of the weekend in bed I am feeling much better today, but will have to take things easy and it is half term too!
Well done Lorraine - please email me your address and I will package and post your blog candy to you in the next couple of days! I hope you enjoy it!
I will be back later with a card - See you soon! and thanks for looking - Debbi x x x
Sunday, 24 October 2010
Quick Post!
Morning! I will be back later with the winners of my blog candy and also the winner of my launch raffle that I have been running since the beginning of the month! These are a little late as I have been in bed all weekend with a tummy bug and have not been feeling the best to say the least - I feel a little more alive this morning so will make sure the draws are completed and the winners displayed here!
Have a great day people x x x Debbi!
Friday, 22 October 2010
BIRTHDAY BLOG CANDY...
Well hello blogland! Today is my birthday and I am offering some Stampin' Up! blog candy...
The rules will be that you have to follow my blog (if you don't already) and link the candy post to the side bar of your blog (if you have one!) and leave a comment at the end of this post... I will leave the blog candy draw open for a week and draw the winner next Friday...
So what am I offering - I am offering a stamp set - one of the level one hostess sets from last year out of the box, a reel of ribbon still wrapped whisper white 1/4' grosgrain, an unopened pack of neutrals buttons and a selection of retired card stock from last years catalogue...
In the last couple of weeks I have had a number of new followers and this seems the perfect time to say welcome to those too!
So what do I have planned for my birthday?? Not a lot is the answer! ;-) yesterday morning I managed to put my back out just before the school run and that has rendered me pretty much useless since then - although what better excuse do you need not to do any housework than a bad back and your birthday!
I will hopefully manage to do a bit of crafting today - the SU Convention draws ever closer as does the number of swaps that I should be completing!
So good luck with the blog candy and thanks for looking! Have a great day - Debbi x x x
I will post a photo of the blog candy later tonight or tomorrow x x x
The rules will be that you have to follow my blog (if you don't already) and link the candy post to the side bar of your blog (if you have one!) and leave a comment at the end of this post... I will leave the blog candy draw open for a week and draw the winner next Friday...
So what am I offering - I am offering a stamp set - one of the level one hostess sets from last year out of the box, a reel of ribbon still wrapped whisper white 1/4' grosgrain, an unopened pack of neutrals buttons and a selection of retired card stock from last years catalogue...
In the last couple of weeks I have had a number of new followers and this seems the perfect time to say welcome to those too!
So what do I have planned for my birthday?? Not a lot is the answer! ;-) yesterday morning I managed to put my back out just before the school run and that has rendered me pretty much useless since then - although what better excuse do you need not to do any housework than a bad back and your birthday!
I will hopefully manage to do a bit of crafting today - the SU Convention draws ever closer as does the number of swaps that I should be completing!
So good luck with the blog candy and thanks for looking! Have a great day - Debbi x x x
I will post a photo of the blog candy later tonight or tomorrow x x x
Thursday, 21 October 2010
hand stamped images... challenge 38
This week the challenge over on hand stamped i ages is a great one to get you in the festive spirit, they were asking you to create a card, tag and box in preparation for your wrapping when the holidays hit! I have managed to do a card and a tag but time ran out for me to cerate the box to go with it!
For this challenge I decided to use my Forever Friends stamps again and create something was was Christmasy and traditional with the colours that I used...
I coloursed the bear with my copics again just using gentle shading on the edges of the bear, and for the present and the bow and the Santa's hat I used cherry cobbler and wild wasabi from stampin up - using the ink pads and an aqua pen. adding a layer of colour and then waiting for this to dry and adding another. I added glitter to the hat for some Christmas sparkle and dabbed colour onto the tag in the image with a gold pen outline. I mounted the image on bazzil card stock and then again on stampin' up card to match the ink that I used. The ribbon detail is from my stash and I bet I have had that for 4 years - but the colour was a great match I think you will agree. The DSP across the top of the card is Forever Friends and I have inked the edges of this. The sentiment that I have used is also from Forever Friends. Using the same image for the tag and same method to colour it.
I hope you like my card and tag and thanks for looking - Again I have loved this challenge and it has relieved some of the convention stress I am feeling! Debbi x x x
Labels:
forever friends,
hand stamped images,
stampin' up
JUGS challenge 55
The challenge over on Just us Girls this week was to create something that was using the colours Black, Cream and Craft - I love these colours so knew that I would have to have a go I thought that I would do something different using the stamp set Artistic Etchings as everything that I have crated so far have been bright and colourful - so this was more subtle and I loved it. I started with a black card blank and then to this added a piece of craft that I have stamped off images randomly - the circle and the crown stamps - again loving the effect that you get from these stams to create backgrounds.
I then added a panel of craft to the top of the card and added some black ribbon to add extra detail to it I stamped the sentiment in the bottom right hand corner in basic black. The Eiffel Tower image is stamped in black onto very vanilla card and I have added some taffeta ribbon for extra detail to the edge of this. I inked the edges of the image and then mounted it on basic black card.
and time for a challenge...
I have spent so much time creating things for Convention in the last week last night I decided that I was going to create just for me... Looking through my favourites blogs I knew that I had to do the challenge over on the Forever Friends blog - you had to use 3 flowers, 2 papers and 1 button. I though I would drag out my Christmas stamps and have a play...
I used a stamp that I bought last year and it has never seen ink. I teamed this with 2 of the papers from the Forever Friends Christmas stack also bought last year, the flowers I have had years as they are not really my thing! I have inked them with cherry cobbler ink SU! to match the inking I have used on the image. and a square card blank.
I have coloured the bear on my image with copics and gently shaded the belly of the bear and I coloured the robin body as well. and used SU! ink pads and an aqua marker for the tree and the present! I like the effect of the two together and am pleased with the result. I have mounted the image on cherry cobbler card and added some glitter for extra sparkle. I have inked the edges of the DSP that I have used I have added ribbon button detail to the top right of the card and the required flowers to the bottom right of the card.
I hope you like the card and thanks for looking - I have to admit I liked completing this challenge and it took me out of my comfort zone! there is another day to enter my birthday blog candy as well - Debbi x x x
Wednesday, 20 October 2010
Goals...
I have set myself the goal of being a better blogger and the main reason for this is I need to remain focused on my crafting as I am very busy in the next couple of months with the SU European Convention, my first craft fair, classes, workshops and Christmas! So I determined to use all this activity to my advantage and blog about it at the same time...
For Convention that is becoming scarily close and I am no where near prepared enough in relation to the swaps that I should have completed - I need to have completed...
team cards, scrapbook pages, gifts - non are done! 3D swap 10 - have designed it not made any though, Business Tools swap - 10 completed hoorah!, Card Candy - finished today and approximately 300 general swaps in various designs that I have designed and not really started! I feel lots of late nights coming on and a bit of stressing as the countdown begins in ernest!
I don't want to show the finished products, until the ladies that are receiving them will be on their way to collect there goodies, but here is an idea of the mess that I have been making today whilst completing the card candy - you can see the colour - I think they look great together...
Thanks for looking Debbi x x x
Tuesday, 19 October 2010
Two monkey's
Hello... Today's card is the card that I created with the help of Joshua for Aidan's birthday - it needed Joshua's input for the card as it was from him! he chose the colours and he also chose the characters from the stamp set that he wanted. Although when he was looking at the colours he just went for the same ones that I had been using to create Aidan's other card - easily pleased...
So for this card I stamped 2 monkeys in the centre of the card and at either side of these I stamped two tortoises, I used the sentiment from all in the stars as this was to hand and I used the colours soft suede and brocade blue.
I inked the edges of the panel and then distressed the edges of the panel, once completed I mounted this on a piece of brocade blue card that I have also inked the edges. I inked the edges of the brocade panel and have added this to a white card blank where I have inked the edges in both brocade and soft suede.
I hope you like the card and thanks for looking - Debbi x x x
Subscribe to:
Posts (Atom)